How to do Weighted Round-Robin Load Balancing with ngrok Cloud Edges
The purpose of Load balancing is to improve application performance and reduce burden by distributing incoming traffic across servers. This leads to faster response times for user-facing applications.
Weighted Round-robin load balancing while similar to round-robin load balancing here you can assign a numeric weight to all of the applications behind the load balancer. Weights can be assigned based on factors such as the application state, server’s processing power or total bandwidth.
Prerequisites
To follow this guide, you will need:
- An ngrok Pro or Enterprise account.
- A local computer with
ngrokinstalled by following our installation guides.
If you are going to be following along using ngrok CLI, you will need:
- An ngrok API key configured on your ngrok agent.
If you are going to be following along using CURL, you will need:
- An ngrok API key as an environment variable named
NGROK_API_KEY.
Step 1 — Create a Reserved Domain
We're going to be using ngrok edges to load balance across multiple tunnels.
To start load balancing traffic with ngrok edges, you need to have a reserved domain.
Let’s reserve a subdomain on ngrok.app:
- ngrok CLI
- CURL
Loading…
- Replace or set
NGROK_SUBDOMAINas the subdomain you'd like to use for this guide.
Loading…
- Replace or set
NGROK_API_KEYto your ngrok API key. - Replace or set
NGROK_SUBDOMAINas the subdomain you'd like to use for this guide.
After running, you should see the following:
Loading…
When you have completed this step, you can move on to the next step.
Step 2 — Create a ngrok Cloud Edge
Now we can create a ngrok Cloud Edge that points to our
newly reserved domain on port 443:
- ngrok CLI
- CURL
Loading…
- Replace or set
NGROK_SUBDOMAINwith the value used in the previous step.
Loading…
- Replace or set
NGROK_API_KEYto your ngrok API key. - Replace or set
NGROK_SUBDOMAINwith the value used in the previous step.
After running, you should see:
Loading…
Export the id value as a new environment variable named NGROK_EDGE_ID:
Loading…
Now that we have an edge, we can move onto the next step.
Step 3 — Create Tunnel Group Backends
Now that we have an edge we can begin to build the parts to do weighted load balancing.
Lets create two tunnel-group backends to do traffic management on our edge.
Create our first backend with label region=us:
- ngrok CLI
- CURL
Loading…
Loading…
- Replace or set
NGROK_API_KEYto your ngrok API key.
You will get something back like:
Loading…
Export the returned id as a variable:
Loading…
Create our second backend with label region=eu:
- ngrok CLI
- CURL
Loading…
Loading…
- Replace or set
NGROK_API_KEYto your ngrok API key.
You will get something back like:
Loading…
Export the returned id as a variable:
Loading…
Now that we have our tunnel-group backends, we can move onto the next step.
Step 4 - Create a Weighted Backend
Now that we have our two region tunnel groups we need to create a weighted backend to distribute incoming traffic on our edge between them:
- ngrok CLI
- CURL
Loading…
- Replace or set
NGROK_US_BACKEND_IDto the id returned in step 3. - Replace or set
NGROK_EU_BACKEND_IDto the id returned in step 3. - ℹ️ Backend weights can be any valid integer between
0to10000
Loading…
- Replace or set
NGROK_API_KEYto your ngrok API key. - Replace or set
NGROK_US_BACKEND_IDto the id returned in step 3. - Replace or set
NGROK_EU_BACKEND_IDto the id returned in step 3. - ℹ️ Backend weights can be any valid integer between
0to10000
You should see the following output indicating we have created a new backend with our tunnel-groups weighted:
Loading…
Export the returned id as a variable:
Loading…
Now that we have the backend for our route, let's move on to the next step of creating our route.
Step 5 — Create a Catch-All Route
Now that we have an edge and our backend, we need a way to route incoming traffic across our tunnels.
Let's create a catch-all route by using path_prefix matching on the path / that will handle all incoming traffic on our edge to our newly created backend:
- ngrok CLI
- CURL
Loading…
- Replace or set
NGROK_EDGE_IDto the id returned in step 2. - Replace or set
NGROK_BACKEND_IDto the id returned in step 4.
Loading…
- Replace or set
NGROK_EDGE_IDto the id returned in step 2. - Replace or set
NGROK_API_KEYto your ngrok API key. - Replace or set
NGROK_BACKEND_IDto the id returned in step 4.
After running, you should get back a route with our edge and backend configured:
Loading…
Once you have followed the steps above, you can starting weighted load balanced tunnels on your ngrok Cloud Edge the next step.
Step 5 — Starting tunnels on your ngrok Cloud Edge
We have reached the point where we can now start to load balance our tunnels across the ngrok Cloud Edge by running ngrok tunnel with our tunnel group labels.
Let's start by running a tunnel on the label region=us with the region flag set to us:
Loading…
And start some tunnels on region=eu with the region flag set to eu:
Loading…
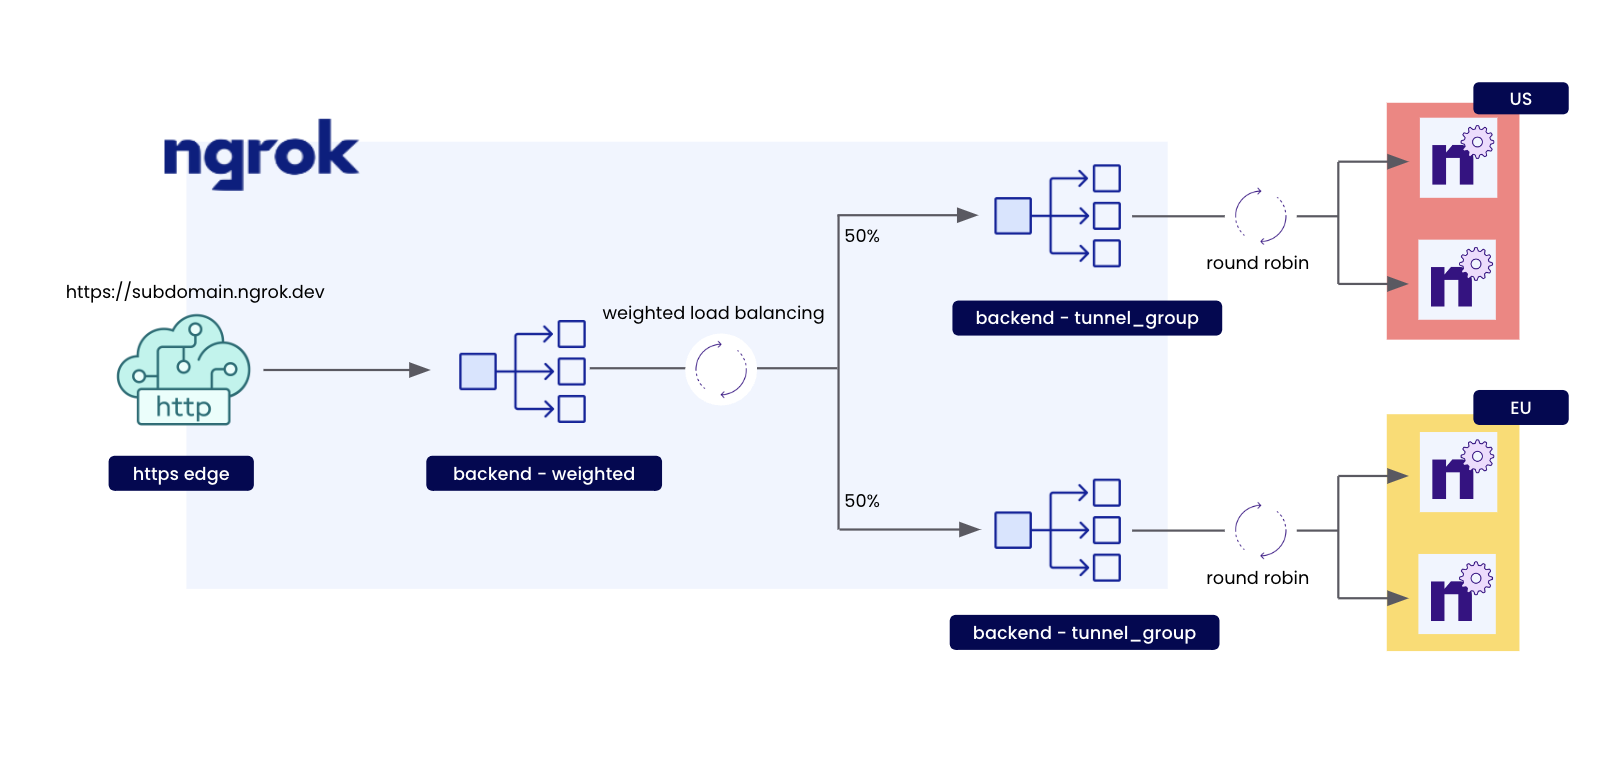
Now any traffic that flows through ${NGROK_SUBDOMAIN}.ngrok.app will be distributed and round robin load balanced 50/50 across agents on both regions.
📝 To create more agents in a region re-run the commands above in a new terminal or machine.
Conclusion
In this tutorial we went over how to setup and create ngrok Cloud Edge tunnel groups and weighted backends with multiple tunnel groups applied to a Cloud Edge route to do weighted load balancing across tunnels in multiple agent regions.